Home
Step by step guide: Switching from Windows and Chrome/Edge (proprietary) to Fedora and Firefox (open source)
This is a step-by-step guide meant for people who know little about computers, and mostly covers relatively straight forward processes that are already designed to be done by non-technical users. If you're already comfortable with computers, then you should consider attempting this without a guide.
-
Exporting important data
-
Installing Fedora
-
Importing important data
Why?
The principal reason for switching to free and open source software is that your computer belongs to you, and not the people who write your software. A good example of this is advertisements: Windows includes software specifically written with the purpose of serving you ads. If Windows went open source, some programmers would surely "fork" it, taking the source code and omitting the code responsible for anti-features such as advertisements, and releasing this objectively better version as a community edition that's closer to what users actually want than Microsoft's official Windows release. This is the promise of open source software; it exists for the user and not the proprietor.
Linux (specifically the gnome desktop environment) has been an easier and more modern desktop experience than Windows for a while now, but it hasn't been suitable for most people for the longest time because the software that most people like to install was unavailable or difficult to install. This has changed mostly thanks to Flathub, who provide universal 'flatpak' Linux apps. These days you can find pretty much all the software most people use on their popular apps page, with it only really missing the Microsoft office and Adobe creative suites, though Office is pretty much the same experience if you use the web version anyway and Photoshop can be installed relatively easily using the Windows compatibility tool Lutris. Both Lutris and Flathub can be installed easily on Fedora, with Flathub having a Fedora-specific installation page, and Lutris having a Fedora section on their downloads page.
An important feature that is missing from Windows is a reliable way to encrypt the system. Without this, anyone who has access to the computer could remove the drive that the OS was installed to and connect it to another PC, allowing them to access the files as if it were a USB flash drive. Aside from locally saved documents, this also means web browsers' profile data can be copied, allowing a different web browser to be started with the same session data and cookies that kept the user logged into their accounts even after closing the browser. When a computer starts up, it loads the OS’s boot partition before the rest of the OS. When you install an OS with encryption enabled, the boot partition is configured to decrypt the rest of the OS during startup. This is usually achieved by asking the user for a passphrase to encrypt the system with during the installation, with the boot partition being configured to ask the user for this passphrase again every time the computer starts up, though this can be done automatically in some cases for PCs that have a trusted platform module (TPM).
People who shouldn't do this:
-
Gamers
Gaming on Linux isn’t popular enough to justify game developers supporting it outright in most cases. In spite of this, there are few games that can't be played on Linux, which is mainly thanks to windows compatibility tools. Wine is the base tool that lets Windows programs run on OSs such as Linux, with Valve's improved version called Proton being integrated into the Linux version of Steam, which can be enabled for all all games whether they've been tested or not by enabling 'Steam Play' in the Steam settings. Proton isn't perfect though, a lot of new games won't work when using Proton on launch day and will be broken until Wine or Proton are updated to support them, there are also games that have anti-piracy or anti-cheating software built in and won't work on purpose if they're not being played on a full Windows system.
-
Users of professional and industry specific software
There is no real incentive to actively develop proprietary specialised software like the Adobe suite and most CAD programs, as the companies that use it can’t move away from what their employees spent years learning when they were students, and current students can’t risk spending years learning a piece of software that isn’t popular enough in their industry to guarantee them a job. The only development these programs see is to ensure this cycle isn’t broken by doing the bare minimum of fixing enough bugs for their software to be usable and creating exclusive software ecosystems.
Stage 1: Exporting user data
This stage requires somewhere to store data. This could be a flash drive or some cloud storage you have access to.
-
Installing Firefox
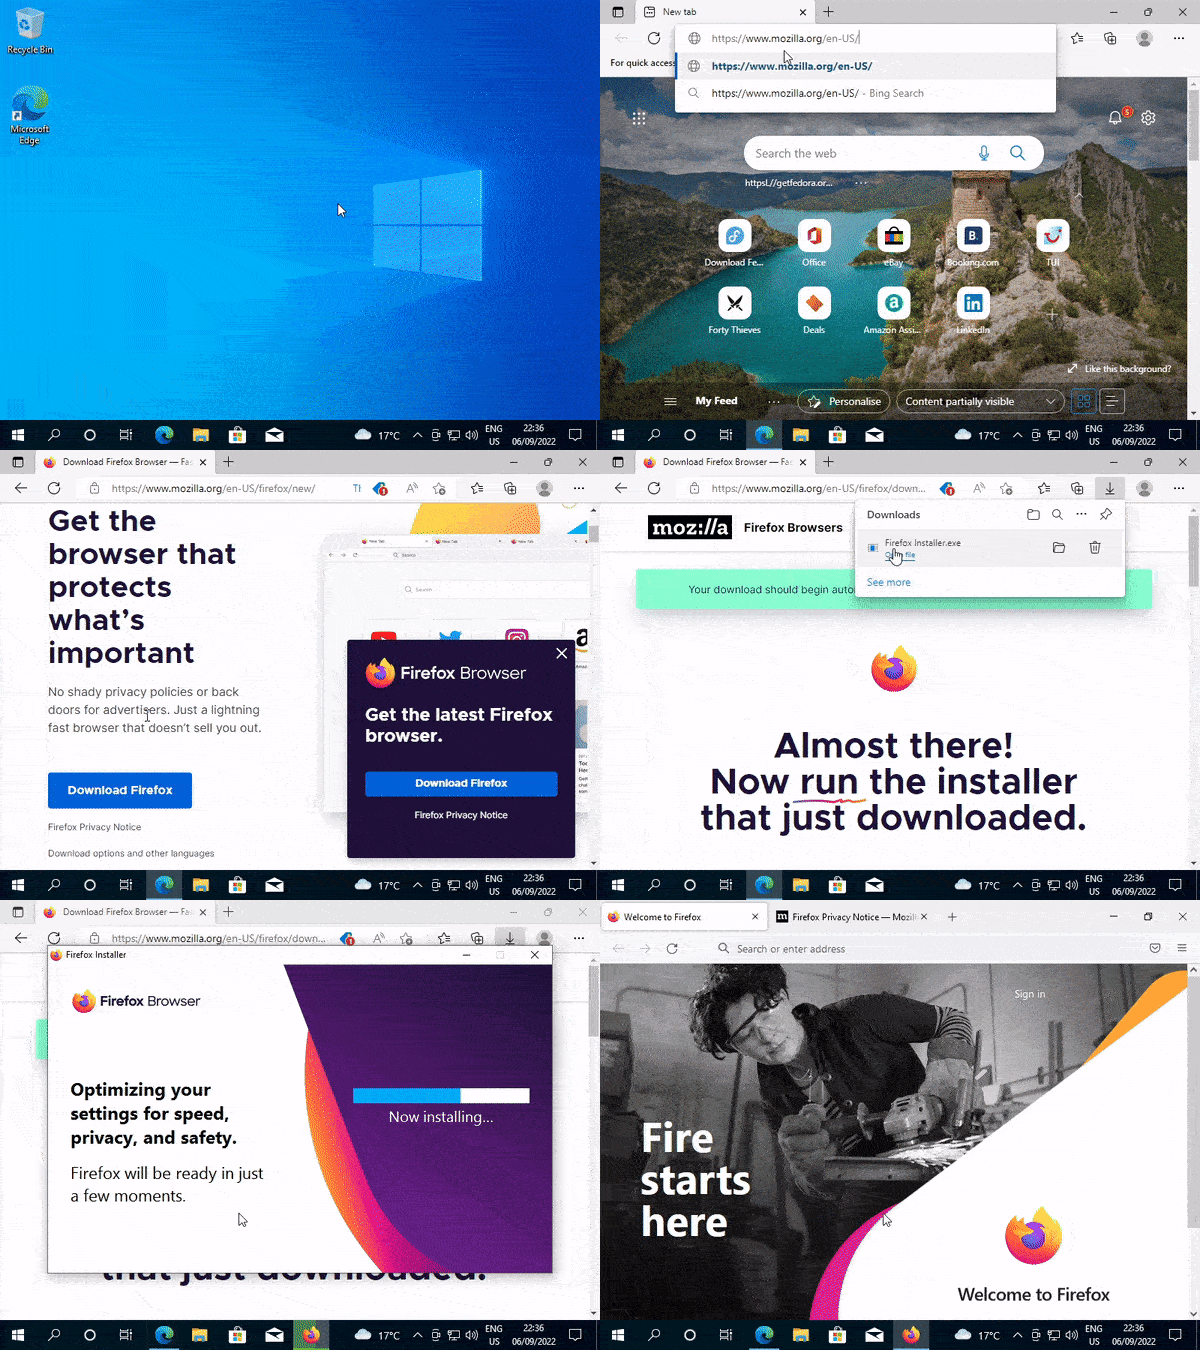
Download Firefox from their download page and run through the installer like usual.
-
Accessing the Firefox import wizard
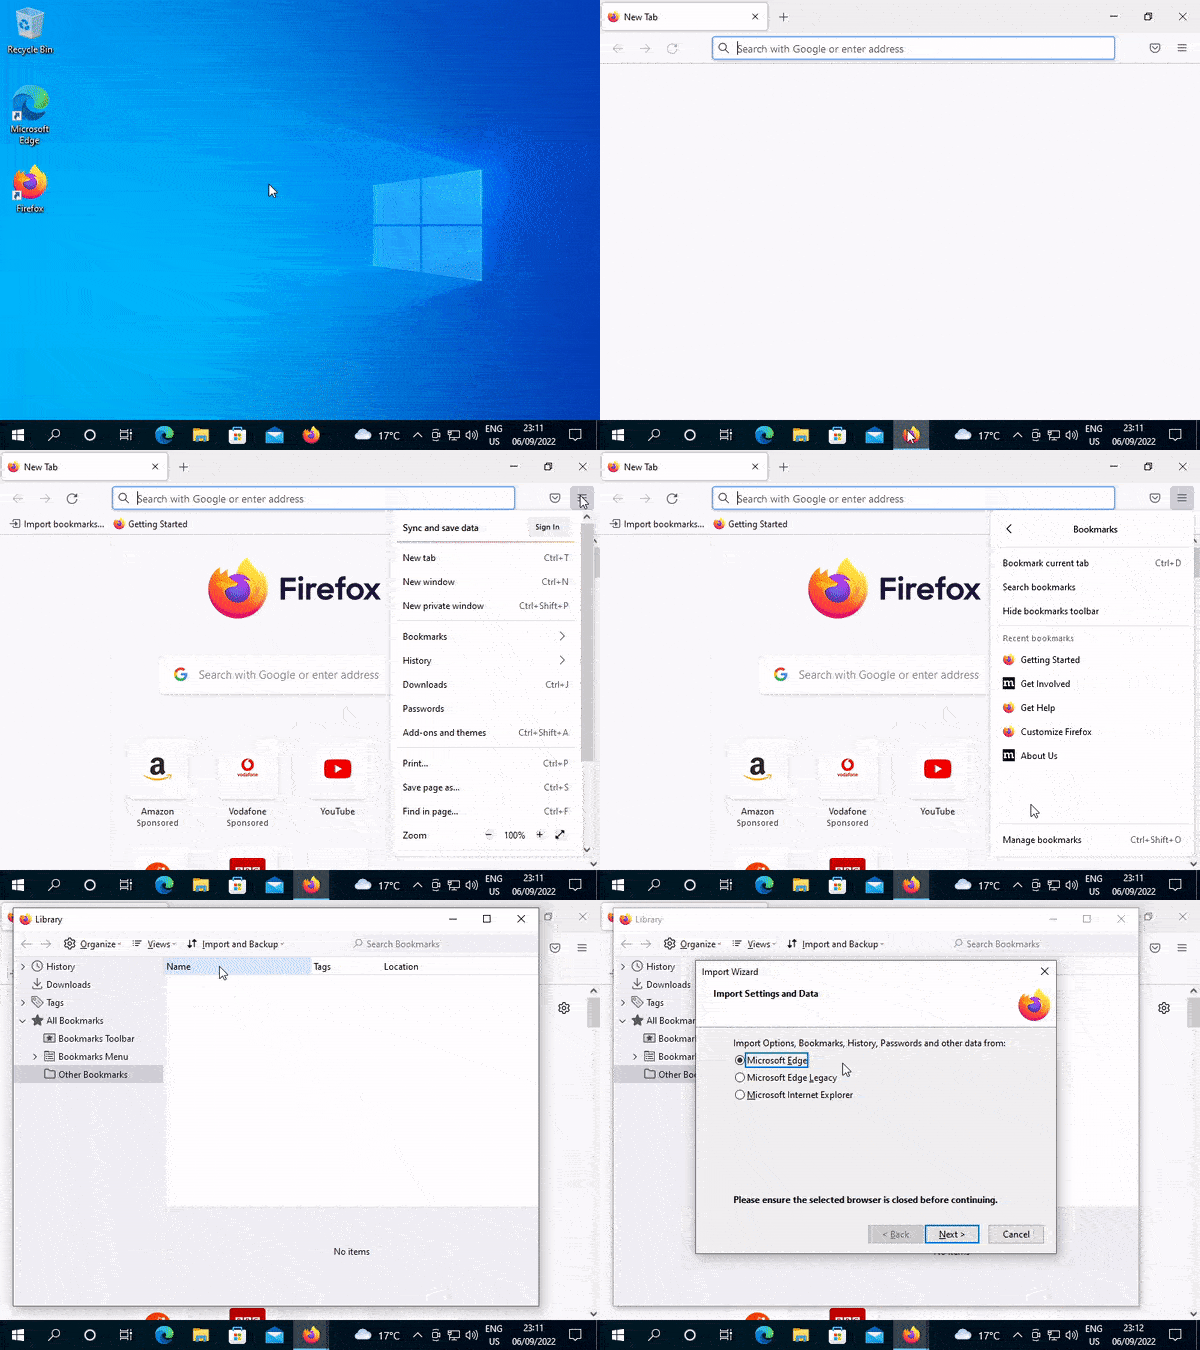
Open Firefox and access the 'Library' with the key combo CTRL-SHIFT-O. Open the 'Import and Backup' menu and select 'Import Data from Another Browser'.
-
Running through the Firefox import wizard
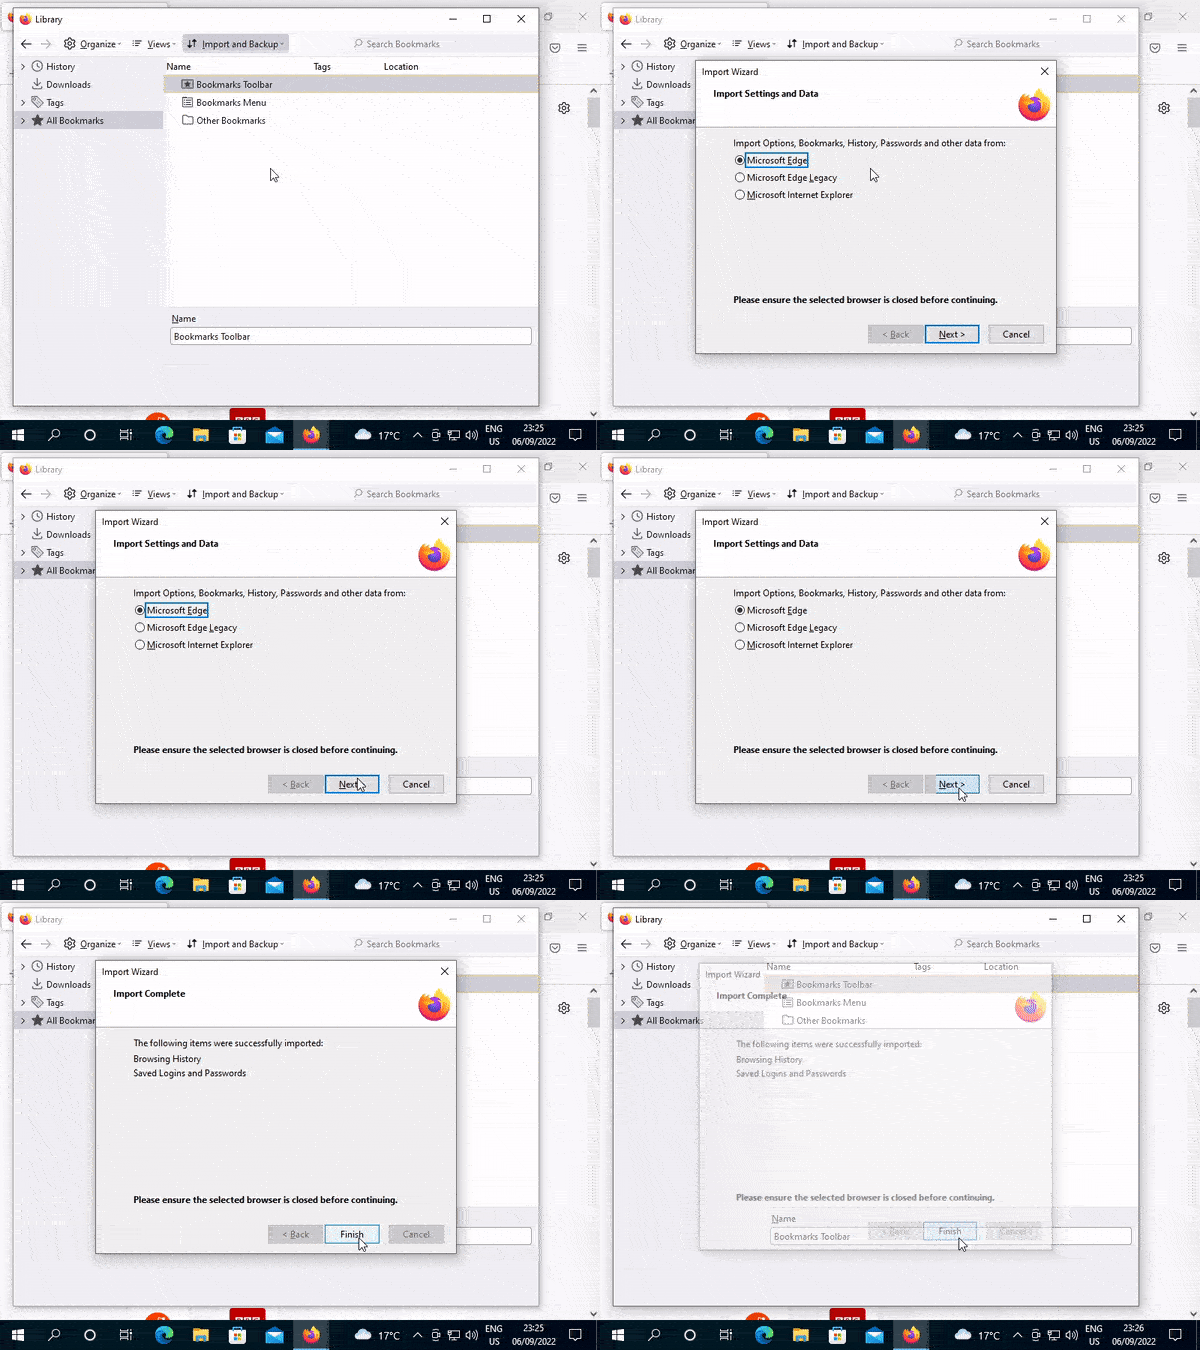
From the 'Import Settings and Data' selection, choose the browser you're migrating from. In the 'Items to Import' screen keep all the items selected.
-
Backing up Firefox
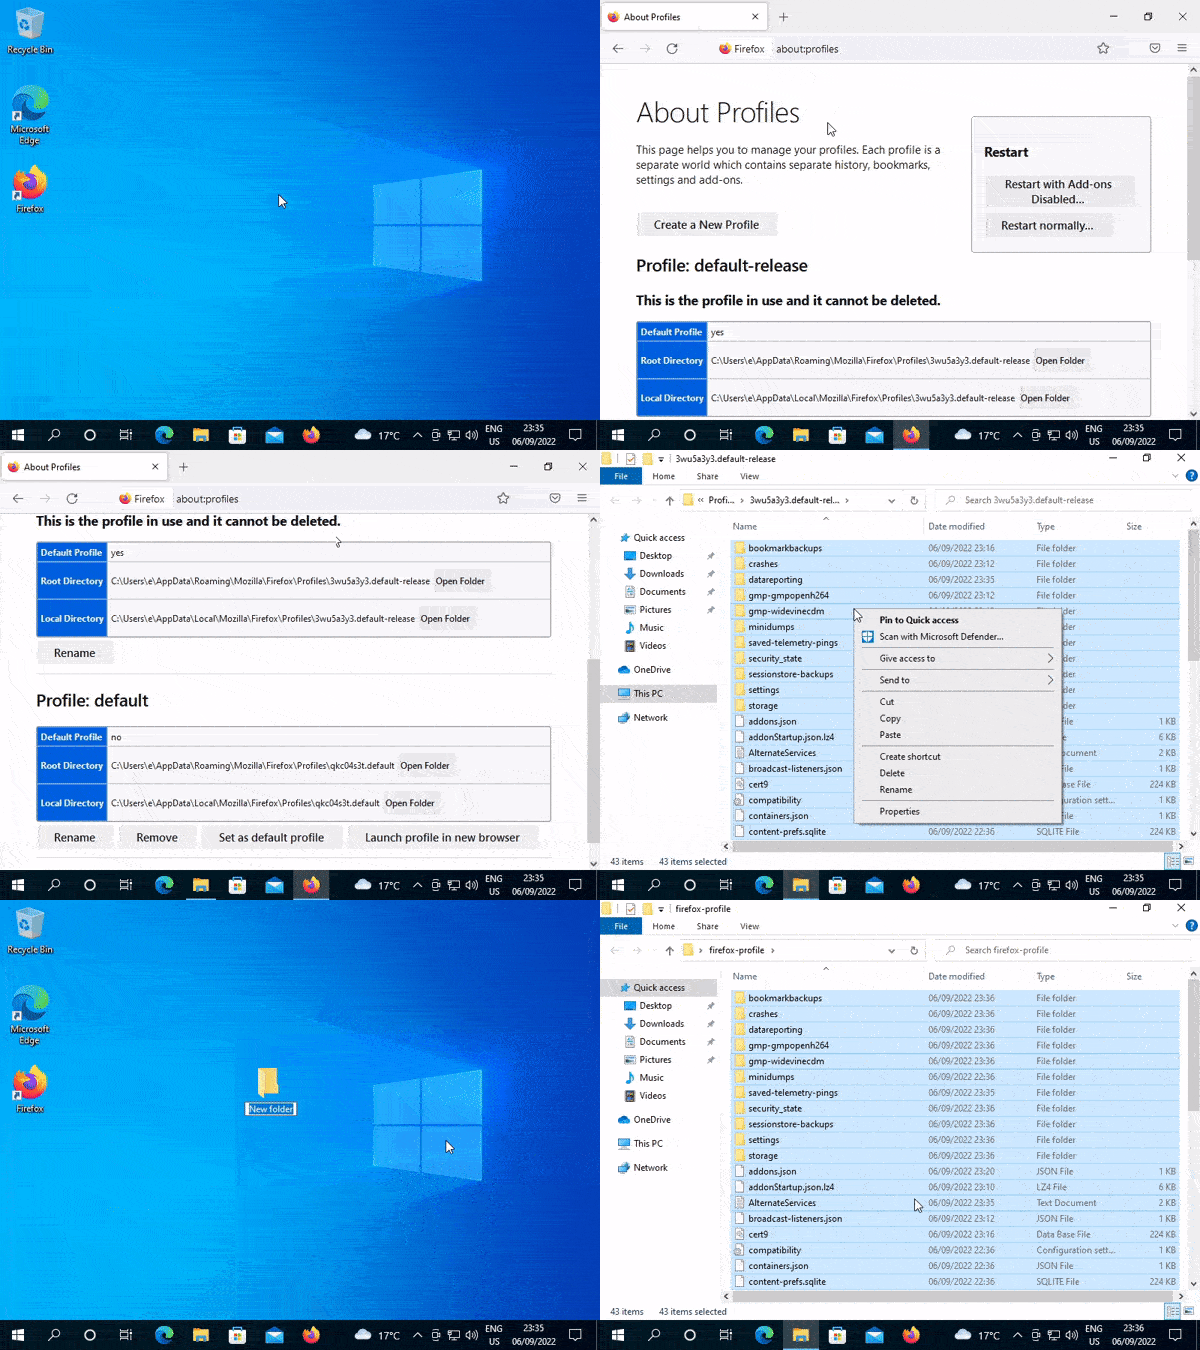
From Firefox navigate to 'about:profiles' with the address bar. Open the directory for the 'Root Directory' of the current profile (this is the profile that does not have a 'Launch profile in new browser' button). Close Firefox and copy the contents of this folder to a new 'firefox-profile' folder.
-
Saving your data
Move the new 'firefox-profile' folder to the storage set aside for this stage. Now would be a good time to also save any other local files (Pictures folder, Documents folder) that you want to bring over to your new operating system.
Stage 2: Replacing Windows with Fedora
This stage requires a flash drive with a capacity of at least 2GB (separate from anything used in stage 1).
-
Install Fedora Media Writer
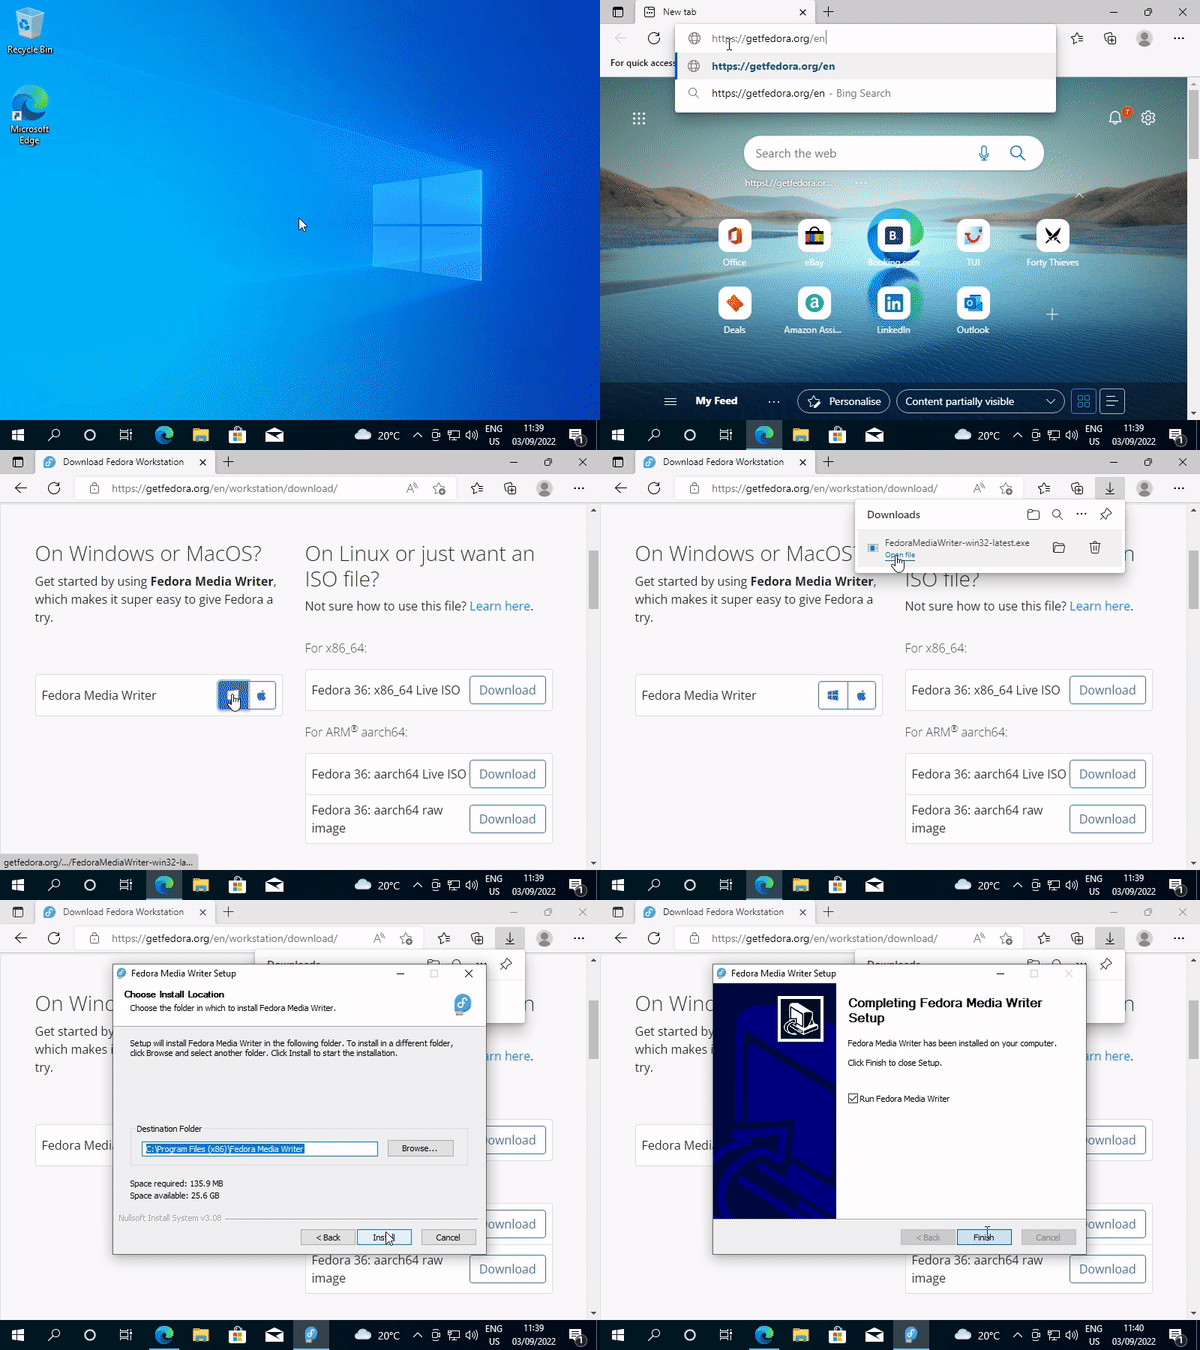
Firstly, we need to install Fedora's 'Media Writer' tool. Download the installer by clicking on the windows logo next to 'Fedora Media Writer' from their download page at getfedora.org/en/workstation/download. Open the installer and run through it like usual.
-
Make a bootable Fedora installer
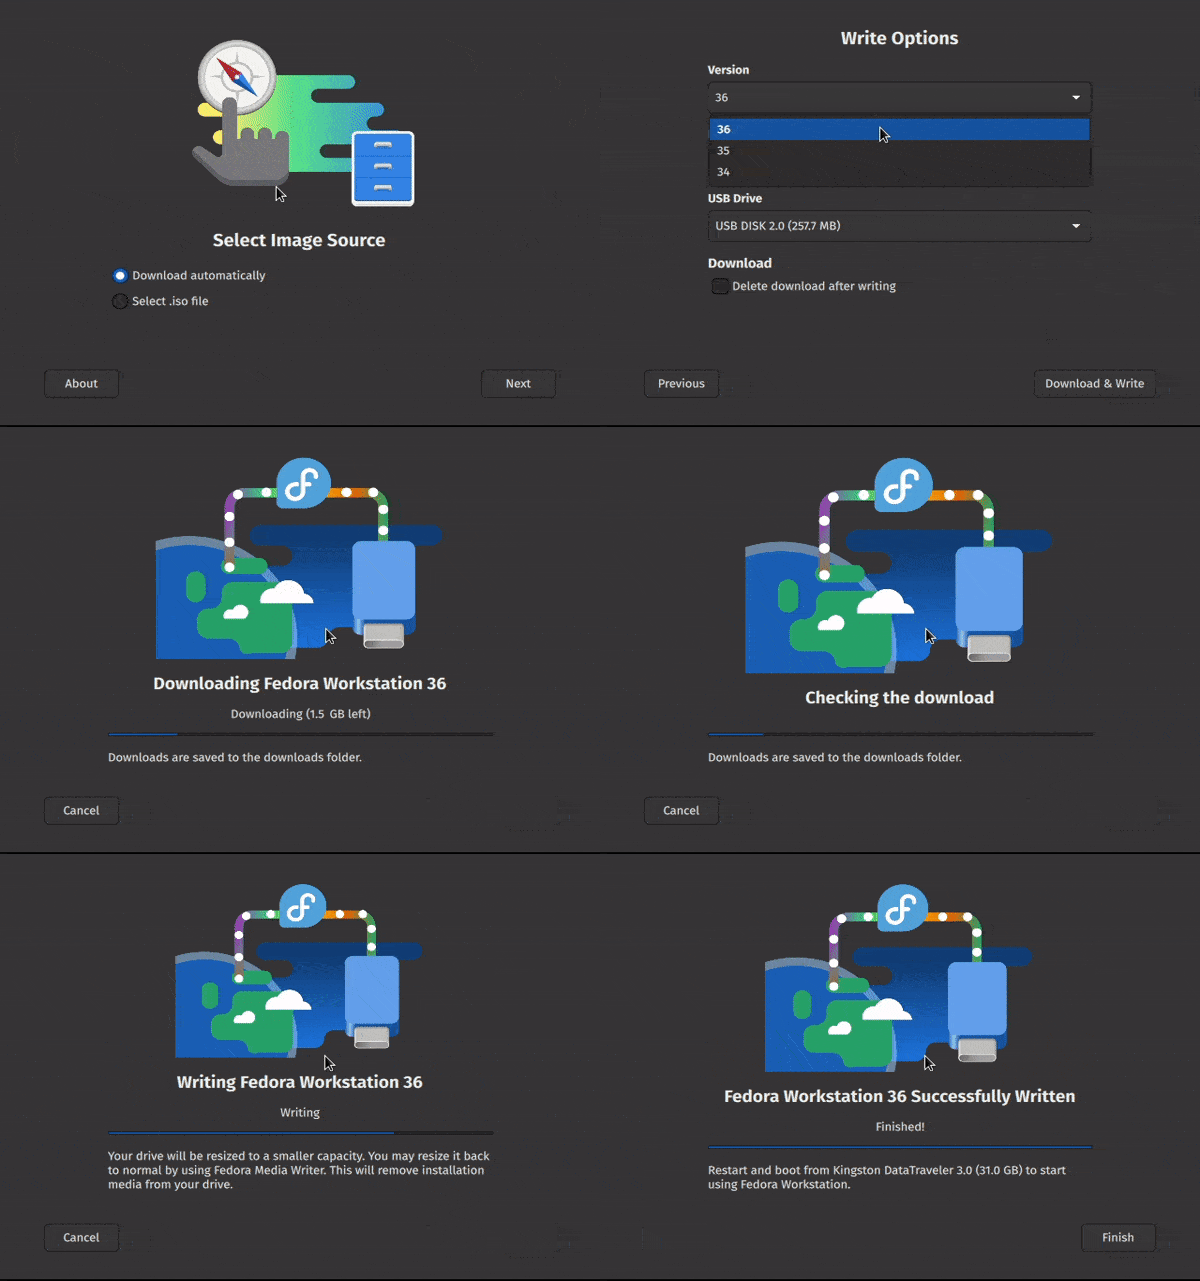
Open Fedora Media Writer and select 'Download automatically'. Choose the Official Fedora Workstation Edition on the 'Fedora Release' selection. For write options, leave the latest version selected, along with 'Intel/AMD 64bit', and select the flash drive set aside for this stage. Proceed to download and write.
-
Boot into the installer
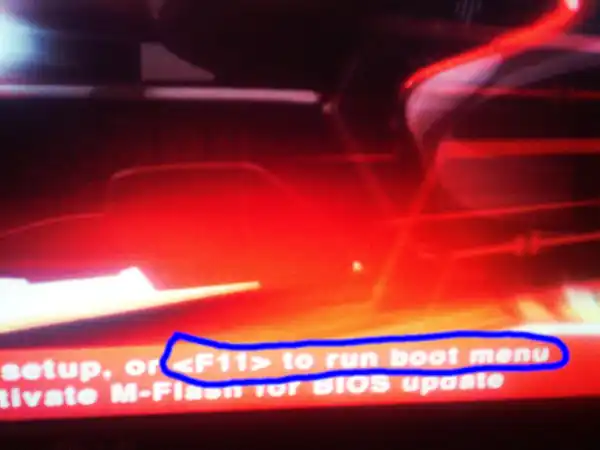
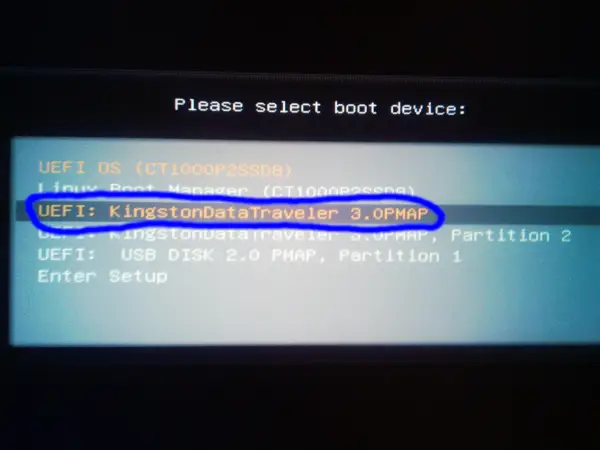
Once Fedora Media Writer has finished writing the installer to the flash drive, power off your PC. Next you'll need to use your flash drive as a temporary boot device. This is usually done by pressing a key displayed on the bios splash screen to either select a boot device, or enter the bios, where there will be an option to select a temporary boot device. Select the flash drive you flashed the Fedora installer to.
-
Run through the Fedora installer

Let the installer boot all the way into the desktop, and select 'Install to Hard Drive' from the welcome window. The installer's first screen lets you change its language.
Next you need to select which storage device Fedora will be installed to, open the 'Installation destination' menu and make sure the drive you're ready to overwrite is selected. Enabling the 'Encrypt my data' toggle is a useful security precaution, especially for laptops. The installer will prompt you to delete the old windows installation on the 'Reclaim space' menu, just select 'Delete all' and 'Reclaim space'.
If the system and localization are correct, begin the installation.
-
Fedora first-time setup

After the installer has finished, reboot your computer. A setup window will appear.
From the privacy screen, you can disable location services (this allows programs to pinpoint your location instead of just guessing based on your ip) and problem reporting (disabling this won't have any drawbacks aside from slowing down development).
On the next screen, make sure to enable third-party repositories. This provides more driver software so the operating system can communicate with more external devices.
Feel free to skip the online accounts screen, you can connect your online accounts later from the settings menu if required. Enter the name, and then the password for your new account. Ignore 'Enterprise Login', this is mainly for businesses.
Stage 3: Importing user data
-
Create a new Firefox profile
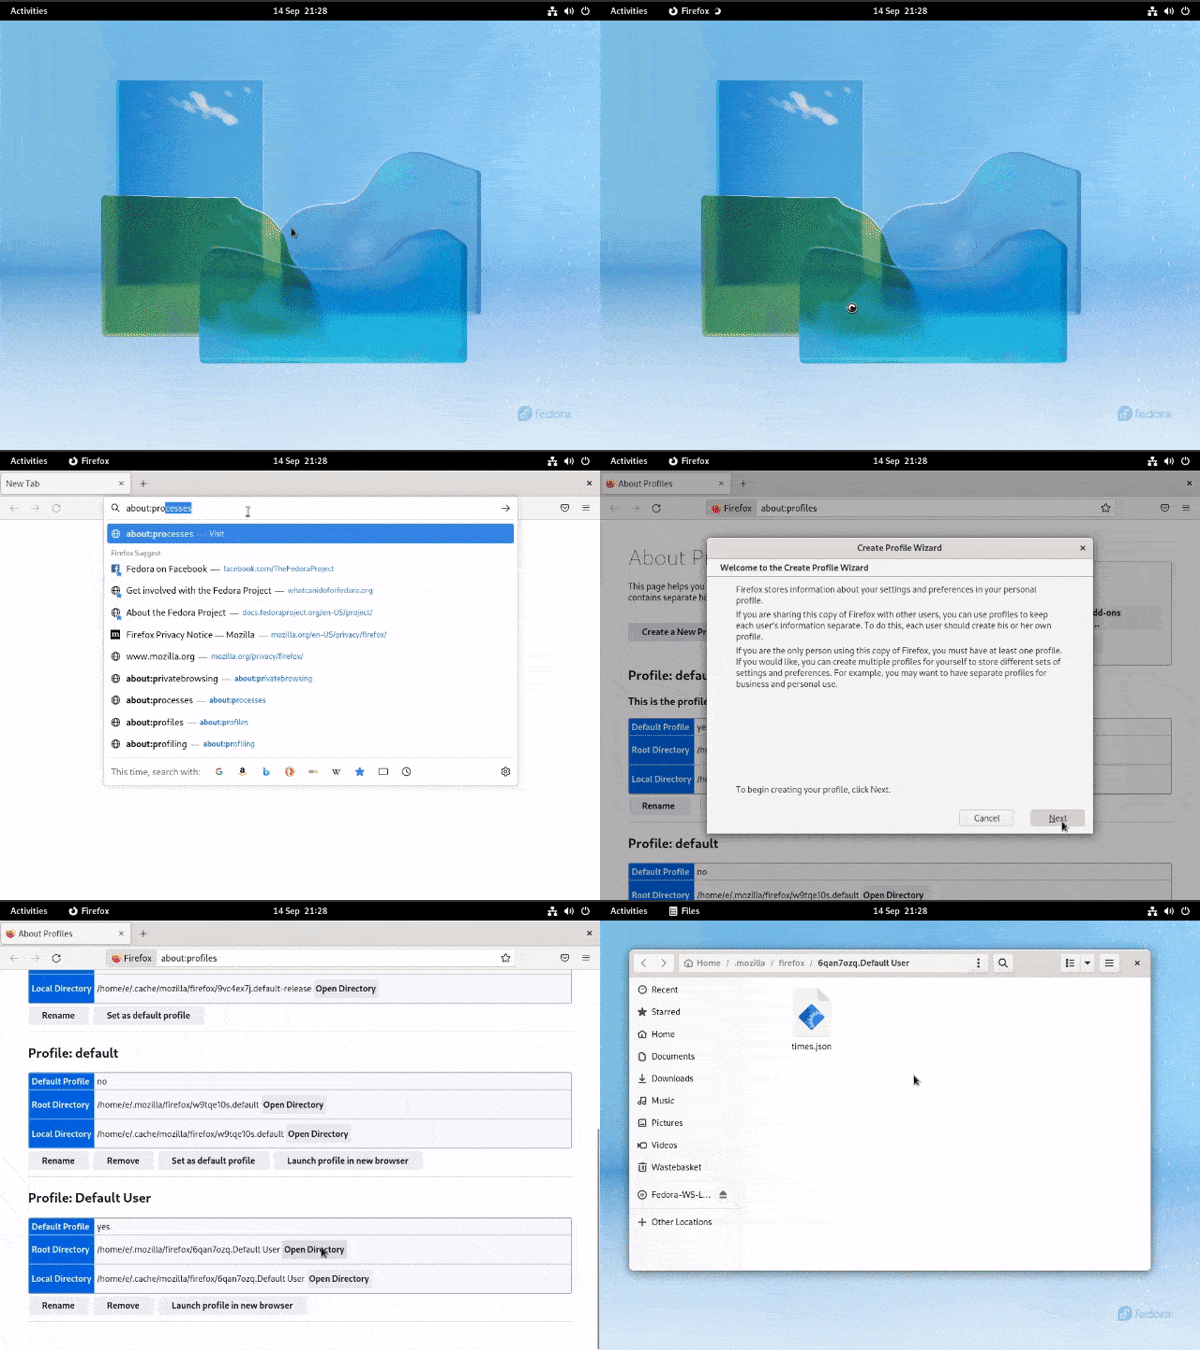
Open Firefox and type 'about:profiles' in the URL bar. Create a new profile. Use the defaults and remember the name of the profile you create. Open the directory for the 'Root Directory' of the newly created profile. Close the browser.
-
Copy the old imported Firefox profile into the new Firefox profile.
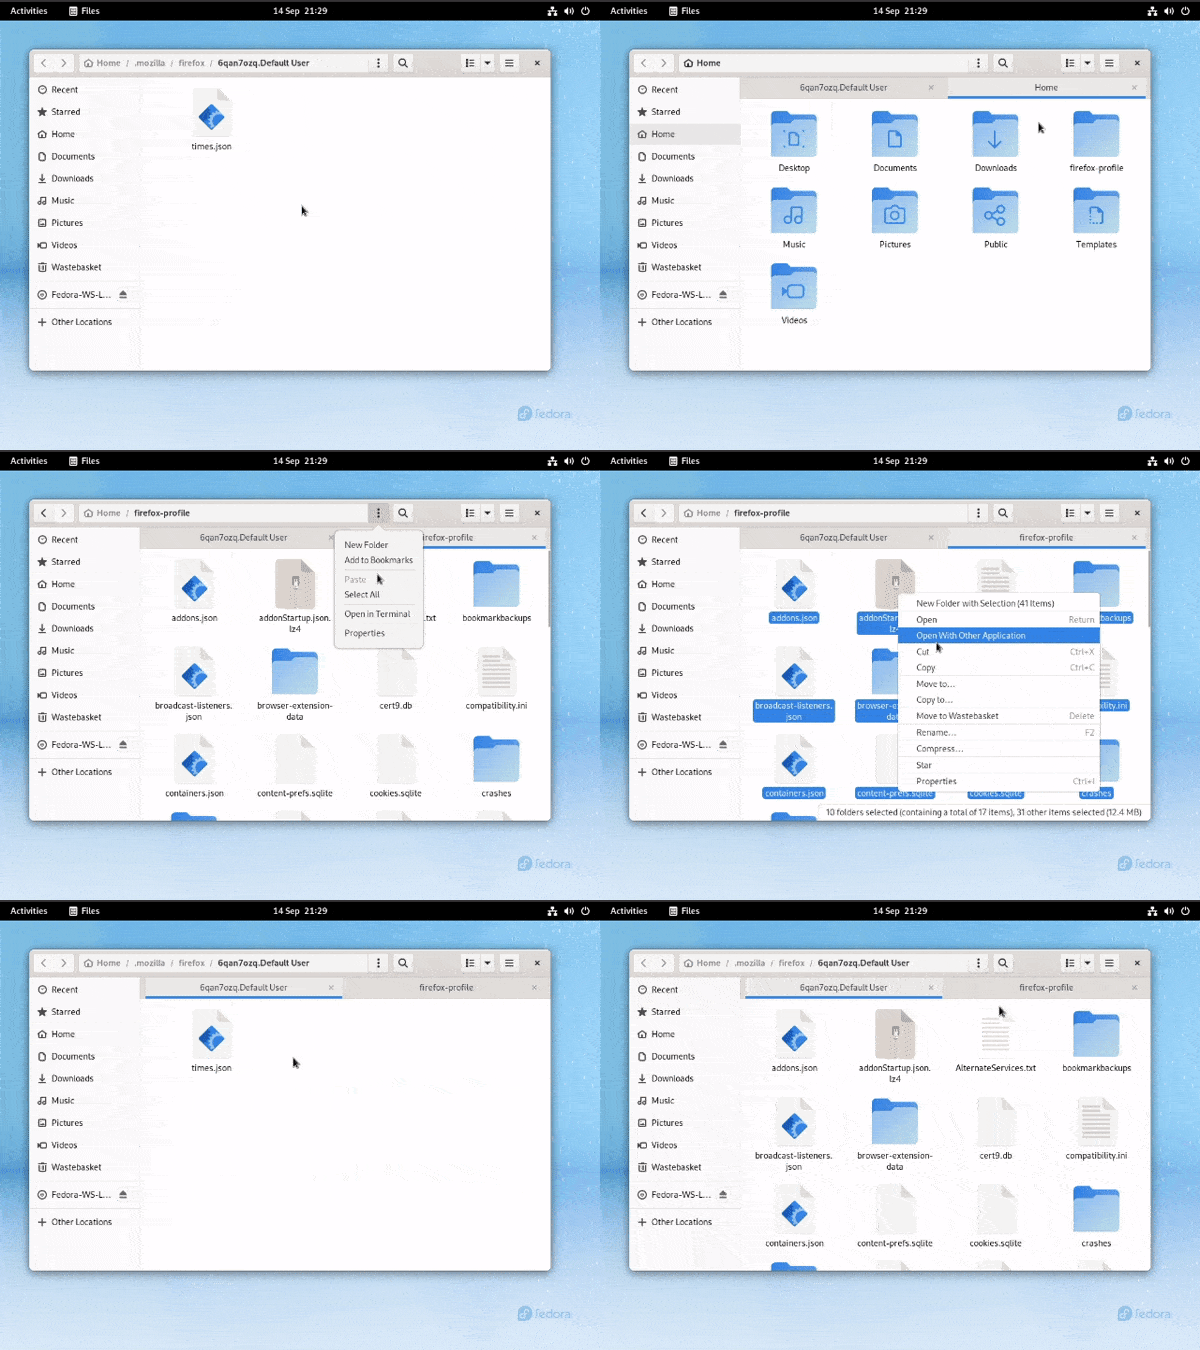
Access the data you saved from stage 1. Copy the contents of the 'firefox-profile' folder you created in stage 1 into the previously opened 'root directory' folder of the newly created Firefox profile. Answer any conflicts with 'replace'.


